Saturday, October 3, 2015

June 11 came before we knew it, and I went out to Dripping Springs to pick up my bees! The bees came as a "nuc" oh hive nucleus. A normal hive is either 8 or 10 frames of bees in a wooden box. A nuc is 4 frames in a cardboard box. The other way to buy bees is as "package bees," which is a shoebox-sized box of bees and a queen. The nuc gives you more bees plus four frames of fully drawn comb that is filled with brood. It's a huge jump-start for a new colony compared to package bees, but you pay for it; a nuc costs about double what you pay for package bees.

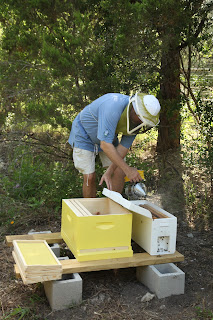
Out in the yard with the hive box, the nuc, my smoker
Installing the nuc into the hive is pretty easy; you just smoke the nuc entrance a little, open the lid, smoke the frames a little, and then move the frames from the nuc box to the main hive box. The whole process takes about 5 minutes.
Smoking the nuc before opening the box 
The nuc is open and ready to move into the hive box.
A little more smoke to calm the bees.
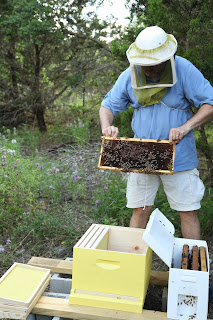
I have pulled the first frame of the nuc and
am ready to move it into the hive box.
My first look at a frame of bees!
One more look before loading the bees into the hive box.
Three frames are in the hive box, and I am getting ready to
load the final frame.
The frames from the nuc are full of comb, but it's not honeycomb -- it's brood comb! Brood comb is where the queen lays her eggs. More on that another time.
Bees! This is what a nuc frame looks like!
The last thing to do after moving all the frames is to install the queen. Many nucs come with a queen loose in the box; these are nucs where the nuc has been grown as a nuc from day 1. Some nucs have a queen in a "queen cage," which indicates that this queen did not "grow up" inside the nuc. That also means that the eggs, larvae and adult bees in the nuc were not laid by her.
Our queen is in this little plastic box!
So what? Well, if the bees in the nuc are not "her bees," then you have to go through a process of adjusting the colony to their new queen. If you just dump a new queen into a colony, the bees may decide she is an invader queen and kill her.

The point of the queen cage is to keep the new queen in close proximity to the rest of the colony so her pheromones can take over the colony's bees. That takes 3-4 days...but you have to keep her alive during that time, so you have to protect her from the rest of the colony. The queen cage does just that: it has lots of air flow through it so her pheromones can get out, but the holes are too small for the bees to get in there and kill the queen. There is also a built-in time-release escape hatch, in the form of a candy plug. The queen eats the candy from the inside, the worker bees eat from the outside, and when they meet in the middle (4-5 days later), the queen is loose. By that time, her pheromones rule the hive, and the workers will all accept her as the new queen.


That's it for this post. Next up: our first hive inspection!

Thursday, October 1, 2015

OK, on to Day 2 of the Great Bee Adventure! Day 2 took place probably a week after Day 1, when I finally had enough time to go assemble all of the woodware that I ordered online.

Assembly Day was pretty easy, actually. The three hive boxes went together quickly, although the 30 frames took a bit longer. After I had done about a dozen frames, I developed a process and was able to get through the rest at a faster rate.


One hive box, full of frames and ready to go!

This is what an assembled frame looks like.

Two hive boxes on a bottom board.

This is almost the entire hive stack: bottom
board, two hive boxes, and a medium honey super.
They're just about ready to paint!

This is the whole stack, with the lid. It's ready to paint!
After doing all the assembly, I headed out to Lowe's to get paint. I picked a "stain covering" white sealer and a pastel yellow.

Here are pictures of the hive stack painted with the primer and then the yellow top coat.


That's it for now! Next up: deploying the hive box to its destination in our back yard, and loading bees into it!

I'm really, really late for writing this post. The Great Bee Adventure started in late April,  but it's now October 1and I am just now writing up the first few days of the GBA. Well, here goes nothing...

The Great Bee Adventure started when Anne and I went to the April meeting of the Austin Area Beekeepers Association (http://www.meetup.com/Austin-Urban-Beekeeping/). We were not planning on getting into bees this year; we just went out of interest and figured it would be a good place to start with some basic introductory material. Both of us were under the assumption that we would go to 6-8 months worth of meetings and then be ready to get some bees.

The joke was on us, however. We met someone sitting in the row right in front of us who was an experienced beekeeper and was just a few weeks away from getting his bees. When his bees arrived, I went out to his property with him and, watched him install his first nuc into a hive box. Then I installed the second nuc, and I realized just how easy it was to do.

I went home that night, talked it over with Anne, and discovered that the local apiary (BeeWeaver) still had nucs available for delivery in June. I ordered a nuc and promptly went online to buy the "woodware," tools and protective gear.

Around a week later, two large boxes showed up on our doorstep:

Hmmmm....what could bee in these boxes?

With great excitement, I opened the boxes to discover a wealth of beekeeping goodies, tightly packed in cardboard.
Lots of goodies were in the boxes!
The boxes contained everything I needed for the first hive: two deep hive boxes, 20 frames for the deep boxes, a medium super (for honey), 20 frames for the medium super, a bottom board, an inner cover, a lid, two bee suits, two sets of gloves, a hive tool (combination pry bar and scraper) and a bee smoker.

The frames needed lots of assembly, while the hive boxes were relatively easy and straightforward.

This is the "foundation" for the frames -- plastic sheets with a shallow honeycomb on them to help the bees get started. Then the plastic is dipped in beeswax so the bees don't know it's plastic.

This is what the frames look like before they are assembled.
I left everything on the dining room table and left it for assembly on another day.

So ends Day 1 of the GBA!